Saturday, August 9, 2014

KNOW WHEN TO GIVE UP

Hi everyone!!!  I'm back after my shoulder surgery.  Not much sewing then.  I tried my hand at English paper piecing and piecing by hand.  I'd rather knit.  Although I learned to quilt by hand piecing, I would rather spend my quiet sitting time knitting, because as I am hand piecing, all I can think about is how much faster I could do it by machine. 

Anyway,
I have had the idea for two miniatures in my head for a long time.  I made the first one which is Chasing Liberty.  Which I am proud to say was accepted into Houston this fall, so if you are lucky enough to go, you can see it. 
The other was a pineapple that was based on a place from a favorite book, and was going to be made with a stack of hand dyed grey gradations that I bought for another project.  It wasn't just a pineapple. The design depended on careful mapping of the colors. I mapped out the colors on the final layout, and mapped each of the 60+ blocks. 

The fabric choice works in one design, but not in another .  My pretty much defunct Log cabin with 3" blocks looks great with the greys, but the pineapples, not so much.
I thought that the shades would work.. as you can see in my preview, but with each block taking 45 minutes to an hour to make.. I had to know at what point to give up the idea.  I made several blocks that went from the light center square to the outside edge.. (not shown).  I could see by doing this that my idea would never work. 

So, the lesson being.  To keep trying is always a great plan, as long as you know when the time has come to give up and try something else.  So, it is back to the drawing board for me.

No big plans so far...

Wednesday, May 14, 2014

THEIR TWISTED LOGIC

We finally got our little display up.
It is in a small space, but it is locked, which is something that makes you feel better if you are displaying miniature quilts to the public.  I hate to be so paranoid about it, but unfortunately, that's the way it is.   My friend Kaye, brought her regular size blue and white single Irish Chain as a backdrop which really set everything off perfectly.  It was fun to work on these projects, and I'm happy that we could share them.

Thursday, May 1, 2014

QUILTING


I did finally finish the quilting on my friend's quilt.  It was not without problems though. I broke FOUR needles just starting the quilting because I didn't pay attention.  The first three were because I didn't tighten my free-motion foot down.  It took the whole thing falling off for me to wise up.  Then I broke the last needle because I didn't tighten the needle into the shaft and it fell and broke.  Then when I finally got my act together, I checked my back and THIS happened

I have several scalpels, so it only took a minute to take this off.  I was probably taking a chance given all of the problems that got me to this point, but it came off easily and I didn't cut a big hole in the back of the quilt.
 The quilting looks defined because I used two layers of Matilda's Own Wool blend batting.  I picked up this small roll at a show a while ago and I don't know if it is even still made. I found that it was uneven in thickness. Thin in one area and fairly see through in others.  That is why I used 2 layers.  I started with silk thread in the bobbin and the needle, but ended up using Bottom Line in the bobbin, which is about the same weight as the silk thread.. and cheaper.
 If this quilt had been intended for competition, I would have taken more time with the stripes on the outer border. But for the most part I think it looks nice. She is putting on a red border.  We hang out little 'show' next week, I will post a photo of everyone's quilt so that you all can see them. 

Saturday, April 26, 2014

MY FRIEND THE LIGHTBOX

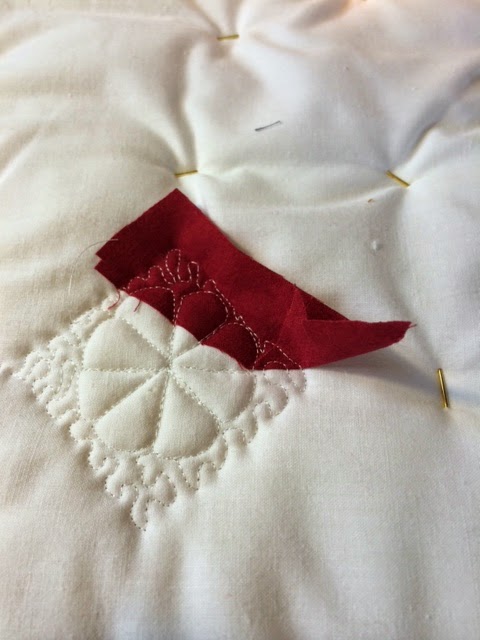
I've told you about my ARTOGRAPH LIGHTPAD before.  But I wanted to show you some pictures of a quilt that I am marking using it.  I am going to quilt a nine patch quilt made by my friend Georgia. I wanted to show you some ideas that I had for the quilting designs thinks to EQ7, I could easily print out what I needed.

I printed out a 4" Dresden petal block  and marked it so that I could easily like it up with the border. I cut out the tops of the petals so that I could use that as reference to position the template when I put it under the fabric.  It worked out great!! I love this lightpad because it has even light distribution from the bottom, and I can have a light shining directly above it so I can see what I am doing on the top.

I wanted to make arcs between the dresdens, so I looked through all of those tools that I never use and found this easy circle cut ruler.  perfect.  I used the arrows on the ruler to line the center up with the center of the blocks.  It worked out very well.  When it came to the little dresdens in the center areas, I got the bright idea that instead of moving the template between blocks, I taped the template to the light box and moved the quilt over it.  That was a good idea even if I say so myself.  I thought that I was finished, but now that I look at the photo, I see that I have to go back and do the half plates in the triangles.  Back to work!!
Stay Tuned,
Teri

Friday, April 25, 2014

TRIED FLIP-FLOP PAPER PIECING

I have MANY quilting books.  I especially like to eventually try out different techniques for making miniature quilts. I'm always open to learning new ways to make blocks more precise.  I'm not really good at cracking the books and actually making projects.  But this morning when I woke up too early I decided to get out some scraps and try out a couple of books from the book  FLIP-FLOP PAPER PIECING 
I have seen a couple of MARY KAY MOUTON'S    quilts in shows. I was especially impressed with her miniature with the same name as her book.
I decided to try a couple of blocks to see how to do it.
I did two Birds in the air that finished at 1.5" and a churn dash that finished at 1".  Both of these blocks would normally be done in  sections.  Bird in the air would be done in two, and the churn dash would be done in a minimum of three, and that is after making half square triangle blocks.  Pretty hard on a really small scale.  Flip-flop piecing is done on a foundation.  Instead of having pieces, the entire block is printed out as one piece, and you piece everything on that one foundation without cutting it apart.  It is done by normal paper-piecing and hand-stitching or fusing certain pieces.  In my opinion it was just as time consuming.  But I think that once you got a few under your belt, it would be a great way to make tiny blocks like the churn dash.  Personally, I would stick with regular paper piecing for most blocks 2" and above.  But then, as you have probably figured out by now, I am a glutton for punishment..  So it's your choice. 
You do have to be careful what kind of fabrics to go with.  These blocks are Cherrywood Hand dyes, which most of the time are the most awesome fabric for anything. But especially with the tiny block, they were a little too bulky which could turn out to be a problem.  Might depend on the block though.  My quilt in the museum is made of Cherrywoods and has 2" finished blocks. It looked fine.  I think though that the smaller you go, the lighter weight your fabric choice should be. 

That's it for today!!  Remember my motto; go small or not at all!  LOL


Wednesday, April 23, 2014

CHASING LIBERTY

I figure that it is time to show you my newest quilt CHASING LIBERTY.  I started it May 6th of last year.  I finished the piecing on July 4th, but didn't get it all together and quilted until towards the end of the year.  The clamshells on the border are hand appliqued with silk thread and are 3/4". It is quilted with silk thread and each quilting line was stopped and the threads were brought back through the batting, by hand, on the front and the back to avoid back stitches.. I think one of the things that I like the best is the different value background.  That came about by accident.  As I was working on the rest, I had 3 pieces of fabric draped over the top of my table top design wall.  I couldn't decide on a background, so I just cut all three and used them all.

Just thought I would share.  This has turned out to be one of my favorites.

Friday, April 18, 2014

WHEW, I'M FINISHED

This one ended up being 15".  I had so much trouble making this one.  Some of the lines aren't straight. But, I'm glad it is finished, and now I am relieved to be able to continue on and do some other stuff.  At least I learned what not to do if I ever decide to make another multiple lone star quilt!  

Thursday, April 17, 2014

IT WILL QUILT OUT

I started quilting this a few days ago. I did the center 'feathers' first, and now I am working on the stars. I'm straight stitching down each line.  I used wool batting for this one, so there is a little more loft to get control of.  Now that I look at the photo, I should have marked quilting on the borders.  I didn't even think about it until this minute.  Probably because I have no idea what I'm going to do yet.   Anyway, I'm making progress of sorts.

Sunday, April 13, 2014

THE DAY HAS COME

Yes, I've put it off as long as I could. The day I will start quilting the lone star.  I'll admit that quilting a piece is my least favorite thing to do.  Mostly because I can't decide on a design. As far as machine quilting goes, you can only know so many tricks.  The main thing is you have to PRACTICE. You have to decide to go in and make mistakes until you get it right.  The funny thing is, I can make mistakes in piecing and rip it all out and start over again, but after I've spent a lot of time piecing something, the last thing I want to do is screw it up with my quilting. Scratch that.. the LAST thing I want to do is pick out quilting.
Anyway, I finally figured out a design.  made true size blocks on graph paper
Then, I will put them on my blocks.  I know that they are just simple feathers, but I need a guide because I love feathers, but I don't practice enough to make them look nice.
This light pad is one of the nicest things that I have ever bought for quilting. ARTOGRAPH LIGHT PAD 17 X 24"  It was pricey, but it gives even light and doesn't get hot.  It is sitting under a sunny window AND a lamp, and it still shines through. 

Keep tuned!


Monday, April 7, 2014

BLAST FROM THE PAST

I have one down and one to go.  I finished the Vortex quilt and named it Blast from the Past as it is a take off of the VORTEX QUILT 1890-1910  which is full size and perfect considering when it was made.  When I started I had no idea how to do it, and how many wedges, what size etc.  So I bought a Creative Grids wedge ruler, which might be good for a full size quilt, but made wedges that were too wide for a miniature and made the resulting quilt bigger than I wanted.  Mine finished at 17x17"
I made 1 full vortex and 3 partial  until I got exactly what I needed.  That meant digging out a protractor and graph paper and figuring it out. I didn't know how many I needed, so I just kept cutting and sewing them together until I had enough to make the circle meet.  Actually it is probably a miracle that it even fit together AND lays flat.
Yes, it isn't perfect, and there are some things that I would change, but I don't plan on ever making another one.. so who cares?  It was fun, it's done, and I like it.

Saturday, March 29, 2014

LIKE HAVING A BABY

Any of you that have ever had a baby know that at some point you say, at least to yourself, "I'm never doing this again".  That's how I feel about this quilt.  At one point I considered just tossing the entire thing in the garbage and moving on.  But, I kept moving forward and finished the center this afternoon.
It finished at a smidge over 11".  I am going to add another white border, and maybe a blue border. Like this whole last part has been, this border thing will also be  a seat of my pants kind of moment. 
And yes, when it is completely finished.. like a baby, I might consider trying again..
After all, practice makes perfect!

Friday, March 28, 2014

LESSONS

I have given a lot of thought lately about why I tend to choose such complex designs to try to replicate in miniature. Some people are extremely talented at some things.  I have seen wonderful tiny lone stars.  Of course I know that practice makes perfect, and maybe I don't practice enough.  I have make a single lone star that finished at  about 9" and then this one.  But, I have thrown away enough to make a second quilt.
Anyway, I'm toiling away on this and it isn't even for a competition.  It is for a little exhibit that my friends and I are doing with our miniature red and white and/ or blue and white quilts.  I'm scrambling to get finished because I found out that the installation is on May 8th. I thought that we had another month.  So I stopped doing all of my distraction projects, and finished up the last two blocks.. then is when I started having trouble
This is what I had intended to do with the sashing.  I love it, but I didn't read my project journal notes, and didn't sew 'scant' seams on the last two blocks.  Which then in turn were enough smaller than the first two that they were a problem when it came to getting the pieced sashing and cornerstones to work.  They look awful.. especially the center nine patch.  So.....
This really hurt.  I had this whole idea in my mind about what I wanted.. but I think that I will just attempt to make it in a larger size some time.
Anyway, I had to figure out how I could lay it out and fudge the difference in sizes. Easier to do without pieced sashing.  Luckily, I am pretty good at doing Y-seams if I do say so myself.  The hardest part was figuring out what sizes of replacement blocks I would need to pull it all together. I am going to piece all of the outer edge blocks and save the center square for last. Of course this means that I will have to mark it and do special quilting.  Ugh.  My least favorite thing to do.

I mentioned to my friend that I kept a project journal.  I have kept a journal on every competition quilt that I have made.  It also has some pages with future ideas and fabric swatches.  I have only entered one wall size art quilt, and that was just done without a plan.  My miniatures are always more complex if not with design, then with color placement so I kept a journal so I would know what I did, so I didn't repeat the mistake.  I write what I learn as I go along to use with future projects.  I couldn't find my competition journal, but this is the one that I am doing now.

For the final vortex design, I put in a tracing of the wedge pattern that I finally came up with, and a photo of the samples.  I haven't completely finished the quilt so I haven't finished up this entry.  The photo on the bottom is of my lone star project.  I glued in a discard block, rather than toss it out.  I sometimes put swatches, and if I know what they are, I write that, maybe how much fabric I used.  Sometimes I keep track of the time I spend, but with my last competition miniature it got into the hundreds of hours and I got tired of keeping track.. I write useless stuff like what tv shows I watch, books I listened to while I worked.  Just stuff to look back on.  A lot of it useful, some of it not.

I really love making miniature quilts, they can be challenging and exasperating, but I just love doing it to myself..